Zulrah is snake boss of level 725 combat in oldschool runescape. The monster can only be killed in solo combat and is accessible via a shrine in the east of Zul-Andra. This guide will teach you everything you need to know to kill Zulrah efficiently. From its 4 rotation maps to optimal gear setups. The boss is often killed for its lucrative rewards and has been a highly profitable monster since its release.
Zulrah Gear Setups
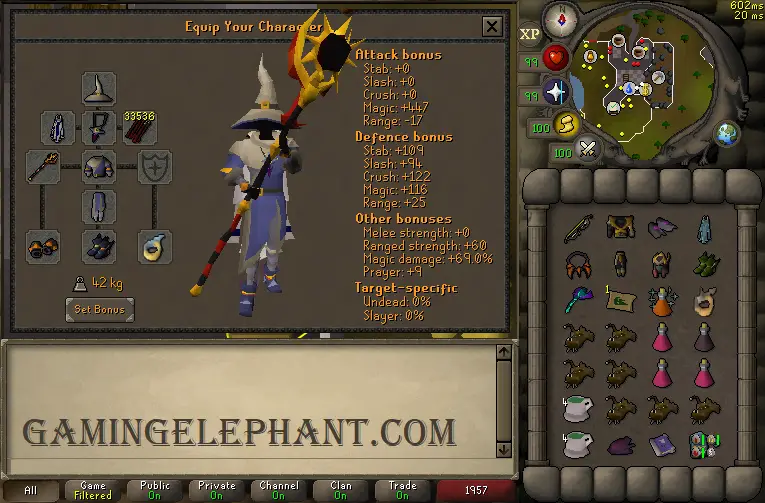
When killing Zulrah you will need both Magic and Ranged gear in most instances. Although, a Twisted Bow can be used without the need for any magic gear, this is more AFK, but comes at the cost of slower kills when compared to a max gear setup. Examples of each can be seen below.
Max Gear Setup
32 – 34 kills per hour with this setup.
Tbow Camp Gear Setup
28 kills per hour with this setup.
Beneficial for its afk-ability due to minimal switching. Also good in early stages of learning the bosses 4 rotations.
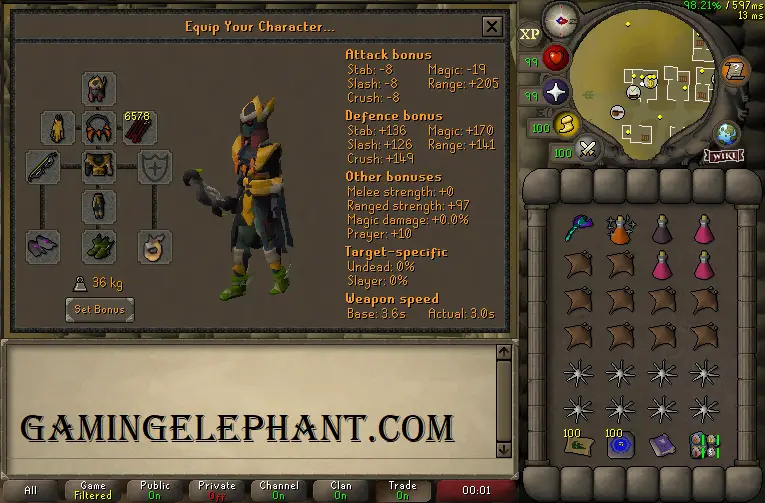
Gear Advice for Zulrah
- Always use Dragon Arrows. The initial damage roll still rolls between 0-maxhit then any damage roll above a 50 rerolls to a random value between 45-50. Therefore hitting above 50 more often will result in more 45-50 hits.
- Zul-andra teleports used after banking for the first kill. Only worth using if you are doing multiple kills per trip consistently.
- Shadow > Harmonised Staff > Sanguinesti Staff > Toxic Trident
- Twisted Bow > Blowpipe (ddarts) > Faerdhinen Bow (in full crystal) > Blowpipe (amethyst darts)
- Tbow camp preferred for afk-ability or when learning initial rotations due to simplicity.
Zulrahs Mechanics
Through-out the fight Zulrah will dive down into the swamp and re-emerge, usually in a different form. There are three key forms that Zulrah can take during the fight. The three forms are as follows:
- Serpentine form (Green): Zulrah will attack with ranged, and will be weakest to magical attacks.
- Magma form (Red): Zulrah will attack with Melee, by staring at the player’s current position for several seconds before attacking with its tail at the chosen area. The attack also stuns the player in place, to avoid it simply move away from the position it is looking at. During the form he is weak to magical attacks.
- Tanzanite form (Blue): Zulrah will attack with both magic and ranged. However, magic is used way more frequently so prioritise protecting against this. He is weak to range during this form.
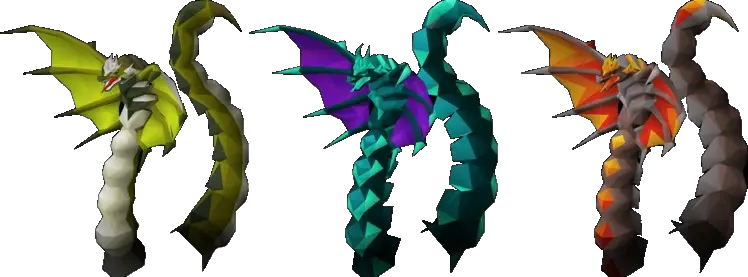
Special Attacks
During the fight Zulrah will use one of two special attacks. These are predictable as they will happen at the same time during each of the four rotations. The two attacks are as follows:
Snakelings
Zulrah will summon multiple snakelings by firing white orbs around the map. They have 1 hitpoint, making a ring of recoil or ring of suffering (r) the best way to deal with the snakelings. They use either melee or magic (never both) but it is not advised praying against them as Zulrah itself can deal higher rates of damage.
Venom Clouds
Zulrah will spit a green orb out, when it lands it will create a 2×2 venom cloud. Standing in it will result in damage being dealt to the player every tick. You will want to learn the rotations and position yourself in the places that allow you to stay in combat but out of the venom clouds.
Zulrah Rotations
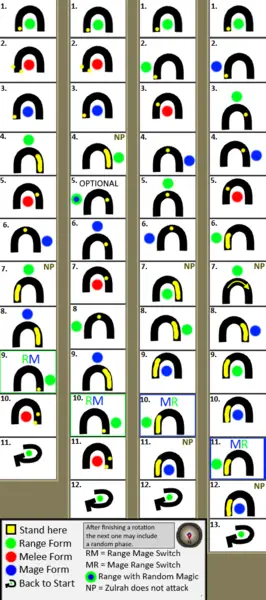
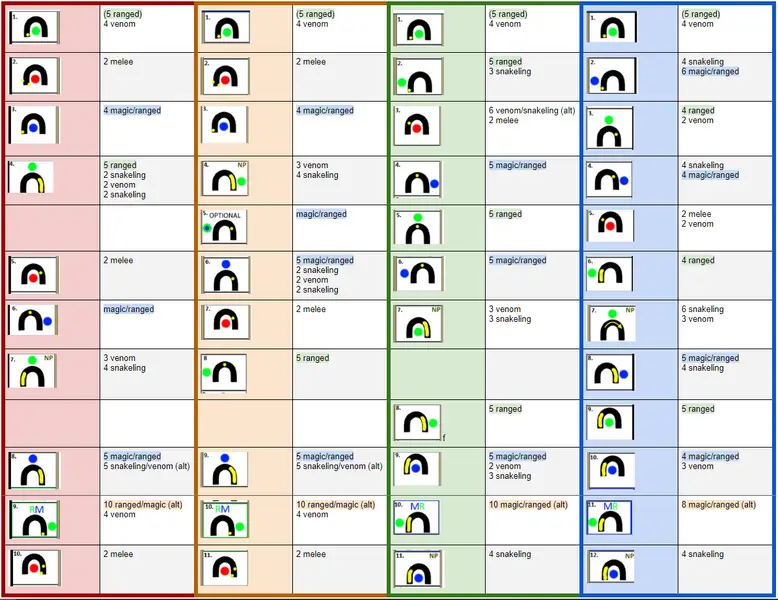
During all rotations, Zulrah will start in the middle of the shrine. It will always start by filling the room with venom clouds. He will also always be in serpentine form, so attack with mage if you have it. It is optimal to run to the north east corner to attack Zulrah to avoid the clouds.
During the second to last phase on all rotations, Zulrah enters a “Jad” phase. Whereby, he alternates between ranged and mage attacks. For rotations one and two, he will start with ranged. For rotations three and four he will start with magic, this is shown in the rotation maps below.
Rotation Maps for Zulrah
The maps below show a detailed explanation of where to stand and the different forms of Zulrah through-out each rotation. Have this open while learning to kill Zulrah so you can use it as a reference point. Each column represents a rotation from 1 to 4, right to left. There are 2 images below, chose whichever you prefer visually, they both represent the same purpose.
